This tutorial is for the new, online project designer. The tutorial for the Desktop Designer is available
here
.
KML Support for Maps
What are KML/KMZ files?
A KML or KMZ file can be added to a project to add custom geographic features to the maps that are displayed in the session list map view and any map points that are displayed in the session. KML can be used to pinpoint locations, add image overlays, and expose rich data in new ways. These geographic features can be displayed without an internet connection to create offline-capable maps. A KMZ archive is used to bundle the KML file with any supporting files that are used in the KML, such as images.
Key Features
- Display custom maps without requiring an internet connection.
- Custom overlays can be used to add images or shapes onto a map.
- Place marks can be added to define custom locations.
- Paths can be used to define lines or custom shapes.
Configuration and Settings
To add a KML or KMZ to a project, open the project in the Mobile Data Anywhere designer and open the project's properties window and navigate to the Session List Options tab. Click the Select File button and select the file you wish to attach to this project. The selected file will be added to all maps that are seen on the mobile app, for this project. This includes the Session List Map View and and Map Points that are displayed in a session.

Creating KML for a project
KML is based on XML notation which is designed to by simple and easily readable. This format is easy to read and understand with or without a basic understanding of XML notation. A KML file can be created or edited in most free text editors. See below for a list of available tools that are freely available:
Basic Editors:
Advanced Editors:
Once your KML has been created, you can preview the KML in Google Earth .
Adding KML Features
A variety of elements can be displayed on maps using KML including;
Looking for more features?
Creating Pins
A custom pin can be added to a map to mark a location. The pin will be added as a purple marker which will distinguish custom pins from any other pins added via an Ultradrop point or a GPS point which will appear as green markers. When these custom pins are displayed on the mobile app, a user can tap on a pin to display the name of the pin.
A pin can be added by adding a place mark using the snippet below. This will add a purple marker at the
specified coordinates with the name
Moore Park Golf
which will be displayed when the marker is tapped.
<Placemark>
  <name>Moore Park Golf</name>
  <Point>
    <coordinates>151.220266,-33.897733</coordinates>
  </Point>
</Placemark>
Creating Paths
A path can be used to draw a line or a set of lines on a map.
An example of how this can be done in KML can be seen below. This will create a set of lines to create
the red path as soon on the right.<Placemark>
<name>M1 Motorway</name>
<styleUrl>#motorway</styleUrl>
<LineString>
<coordinates>
151.218368,-33.869433,0 151.216707,-33.880455,0
151.216707,-33.880455,0 151.217982,-33.886324,0
151.217982,-33.886324,0 151.212966,-33.909617,0
151.212966,-33.909617,0 151.212655,-33.913312,0
151.212655,-33.913312,0 151.211145,-33.920227,0
151.211145,-33.920227,0 151.215181,-33.926426,0
151.215181,-33.926426,0 151.210691,-33.934004,0
</coordinates>
</LineString>
</Placemark>
The path references a
styleURL
with the id of
motorway
which is used to define the width and colour of the path.
<Style id="motorway">
  <LineStyle>
    <!-- Color Format Tip: ## alpha, ## blue, ## green, ## red -->
    <color>ff0000ff</color>
    <width>2</width>
  </LineStyle>
</Style>
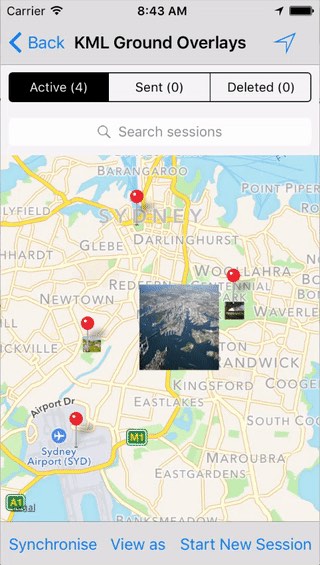
Creating Ground Overlays
A ground overlay can be used to display an image on top of a map.
The following snippet shows how a photo
centennial_park.jpg
can be displayed in a rectanglar area which is determined by pair of coordinates,
North West
and
South East
.
<GroundOverlay>
  <name>Centennial Park</name>
  <Icon>
    <href>files/centennial_park.jpg</href>
    <viewBoundScale>1.0</viewBoundScale>
  </Icon>
  <LatLonBox>
    <north>-33.897385</north>
    <south>-33.902434</south>
    <east>151.237582</east>
    <west>151.230988</west>
  </LatLonBox>
</GroundOverlay>
To add images to KML, the KML will need to be packaged as a KMZ archive. This can be done in two steps on Windows. First, create a zip archive of the kml and image files by selecting the files and selecting Send to Compressed (zipped) folder.
Secondly, right click on the new zip file and rename the file so that
the extension is
.kmz
instead of
.zip
.
Sample Projects
The following samples demonstrate how various KML elements can be used to display geographic data on maps. These samples provide example KML and KMZ files which can be used in your projects.
Sample Projects
Create powerful mobile forms for your business in minutes