This tutorial is for the new, online project designer. The tutorial for the Desktop Designer is available
here
.
Map Point
Learn how the map point can be used and see it in action with the sample projects.
What is the Map point?
The Map Point can be used to display information on a live map view including the device’s current location or gps locations that are stored in another point, such as a GPS Point or an Ultradrop Point . The map point can also be used to populate a point by allowing the user to drop or move a map marker to the desired location.
Key Features
- Can be used in conjunction with a GPS Point to display the GPS coordinates on a map.
- Can be used to set the coordinates of a GPS Point by dropping a pin on a desired location, on a map.
- Can be used in conjunction with an Ultradrop point to display multiple items on a map with the ability to select and deselect ultradrop items from within the map view.
- Add custom and dynamic layers, including placemarks, polygons and overlays, onto a map point using KML stored in another point.
- Use KML to add custom layers to the session list map view using Session List Options.
Configuration and Settings
The properties page for the map point provides an option to select the point to associate with the map point. The associated point’s value must contain valid gps coordinates in order to be displayed on the map point. The points that can be associated with a map point are currently GPS Point and Ultradrop Point . See below for details on each of this point's properties.

Map settings
KML Source Point
This setting allows you to select a point that will be used to store KML markup that can be used to add custom layers to the map point. See below for KML samples.
KML Samples
Template Options
The following settings are only applicable when the selected
Source Point
is a
Template Point
. These settings allow you to customize the appearance and functionality for each entry that is plotted
onto the map.
Tracking User Location
On the mobile device, the map point has several display modes that can be used to track the device’s location and bearing. These services will vary depending on the device's platform:
Apple iOS
| Button | Function |
|---|---|
|
|
Tracking disabled.
The device’s location will be displayed but the map view will not follow where the device moves. |
|
|
Tracking device location enabled.
The device’s location will be displayed and the map view will follow the device’s movements. |
|
|
Tracking device location and bearing.
The device’s location and bearing will be displayed and the map will move and rotate with the device’s movements. |
Google Android
| Button | Function |
|---|---|
|
|
Center on user location.
The map will center on the user's last known location. |
Location Services and Privacy Settings
Permission Requests
Apple iOS devices require permission to access the location services on the device. The app will prompt you to grant permission with the prompts seen below:
|
|
|
Checking the status of permissions
You can check on the status of permissions from within
the app by opening the
Settings page
and scrolling down to the
Location & Privacy Settings
section.
The location service status will be one of the following:
| Status | Meaning |
|---|---|
| Not Set | Permission has not been requested yet. The app will request permission access when location services are required. |
| No Access | The user has denied access to location services. Location services cannot be used by the app until the user changes the location service permissions for the app. |
| Limited | The user has only granted permission to allow location services while the app is in use. The user has not granted permission for the app to use location services while the app is in the background. This will impact the performance of points such as the GPS Tracker point where location information needs to be tracked over time. |
| Full Access | The user has granted permission to access location services while the app is any state. This will allow all points to use location services as required. |
Updating Permissions
To change the permission settings for location services, you will need to open the Location and Privacy settings on the device. For devices running recent versions of iOS (iOS 8+) you can quickly navigate to the location and privacy settings from within the Mobile Data Anywhere app:
- Open the Mobile Data Anywhere app.
- Tap on Settings.
-
Scroll down to the
Location & Privacy Settingssection. -
Tap on the
Location and Privacy Settingsbutton. - This will open the device's Settings app.
-
Tap on
Location. -
Tap on
Alwaysto provide the best experience.
Sample Projects
The following samples demonstrate how the Map point can be used in conjunction with a GPS Point and an Ultradrop Point to provide advanced functionality to your projects. To get started, please start by downloading the project files that will be used in these samples.
Sample Projects
Page 1: Map & GPS Point
The first page of the sample project, map_point_demo.ppc , demonstrates how a map point can be used when it is associated with a GPS Point in order to display a location on a map.
Configuration
The map point, MapPointGPS, is associated with the gps point, GPSPoint. The GPS point has been configured to format coordinates with %lat%,%long% which is the required format in order to display the value on a map.
How it functions on a mobile device
On the mobile device, when a map point is displayed within a session the user will see a map view. The user can interact with this map while on the session form or they can click the expand button at the top right to show a larger map view.
If the associated GPS point has a value, then the map view will display a map pin at those coordinates. If the GPS point does not have a value then the map will zoom on the user’s current location, if it is available.
The user can set the GPS point’s value from the map view by tapping and holding on the desired location. The coordinates will be saved to the GPS point. The location can be adjusted by tapping and holding on the map pin and dragging it to a new location.
Page 2: Map & Ultradrop Points
This page demonstrates how a map point can be used when it is associated with an Ultradrop Point in order to display multiple locations on a map.
Configuration
The map point, MapPointUltradrop , has been configured to use the value of the Ultradrop Point , UltradropPointCities . The ultradrop contains data for three columns; City, Latitude and Longitude. The columns Latitude and Longitude are required in order to display coordinates on a map point. The appearance options have been configured to display the column City for each item which will also be used as the title for each marker on the map point.
How it functions on a mobile device
On the mobile device, the map point will display a marker for each item in the ultradrop’s data. When a marker is clicked, it will display the city for the associated ultradrop item. It will also display a button which allows the user to select/deselect the ultradrop item, from the map view. Selecting and deselecting markers on the map view will update the selected values of the associated Ultradrop Point . Selected markers are coloured red and deselected markers are coloured green.
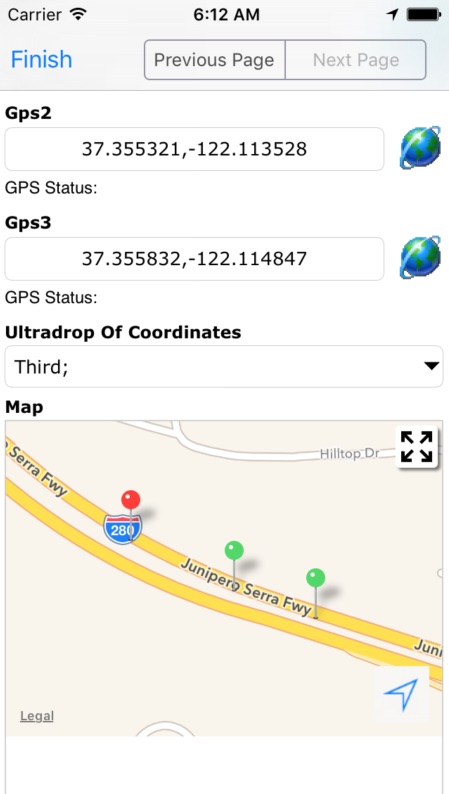
Page 3: Map & Multiple GPS Points
This page demonstrates how a Map point can be used to display multiple GPS coordinates. This uses a combination of GPS points with a Formatter point , Ultradrop Point and a Map point in order to display multiple, dynamic locations on a map.
Configuration of GPS Points
There are 3x GPS Points and each of these points have two associated Edit Points which use Dynamic References to extract GPS latitude and longitude from the GPS Points .
Configuration of Formatter Point
The Formatter Point is used to combine the extracted GPS latitude and longitude coordinates to create the data set to be used by the Ultradrop Point . The Format String if configured with:
First	<% GPS1.lat %>	<% GPS1.long %>
Second	<% GPS2.lat %>	<% GPS2.long %>
Third	<% GPS3.lat %>	<% GPS3.long %>
Once the UltradropOfCoordinates is configured to use this Formatter point as a data source, this format string
becomes the data for the Ultradrop point. This format string defines three rows or Ultradrop entries which
are determined by each new line. The three columns of data for each Ultradrop entry is defined using
tabs
between values.
Configuration of Ultradrop Point
The Ultradrop Point is configured with three columns; City, Latitude and Longitude. The columns Latitude and Longitude are required in order to display coordinates on a map point. The appearance options have been configured to display the column City for each item which will also be used as the title for each marker on the map point.
This point does not have any data and will instead source the data from the 3x GPS Points via the Formatter Point . On the Advanced tab, the Ultradrop point is configured to share data from the Formatter Point called Formatter .
Configuration of Map Point
The map point, Map , has been configured to use the value of the Ultradrop Point , UltradropOfCoordinates . This will plot each of the Ultradrop's entries onto the map as selectable pins. Selecting a pin will select the related entry in the associated Ultradrop point, storing the selected value in the session.
Page 4: Map with KML dynamic selection
This page demonstrates how to add custom KML layers to a map point with dynamic values inserted into the KML markup, using an Ultradrop Point and a Selection Point . The Ultradrop point can be used to select the polygon coordinates that will be overlayed onto the map while the Selection point is used to select the Fill Colour for the polygon.
Configuration of Selection Point
The
Selection Point
is configured with 4 items and is using the
code-based
setting which allows us to display colour names but store a colour code value.
The code based value for each colour is formatted using the standard KML colour format,
AABBGGRR
.
(AA = Alpha, BB = Blue, GG = Green, RR = Red)
Configuration of Ultradrop Point
The Polygons Ultradrop Point is configured with two columns; Name and KML. The following two items were added to store the formatted coordinates to be used as polygons:
Show example KML for Centennial Park item
Centennial Park KML
Show example KML for Royal Randwick Racecourse item
Royal Randwick Racecourse KML
Configuration of Map Point
The map point,
Map2
, has been configured to use the value of the Formatter1
Formatter Point
as the
KML Source Point
. The formatter point combines the values of the Polygons
Ultradrop Point
and the Fill Colour
Selection Point
into the following KML markup:
Show example KML markup
KML Markup
Page 5: Map with KML from Ultradrop
This page demonstrates how to add custom KML layers to a Map point using an
Ultradrop Point
that outputs KML markup to the Map point's
KML Source Point
.
Configuration of Ultradrop Point
The Ultradrop Point called UltraDrop, is configured with two columns; Type and KML. The KML column is configured to output its value to the Edit Point called KML Source. The following items were added to store the KML markup for each type:
Show example KML for Placemarks
Placemarks KML
Show example KML for Paths
Paths KML
Show example KML for Polygon
Polygon KML
Show example KML for Ground Overlay
Ground Overlay KML
Configuration of Map Point
The map point,
Map1
, has been configured to use the value of the KMLSource
Edit Point
as the
KML Source Point
. When this point contains valid KML markup, the custom layers will be added to the map point.
Create powerful mobile forms for your business in minutes