Quick Start Guide
What is Mobile Data Anywhere?
Mobile Data Anywhere is a cloud hosted solution that is used to create data collection apps for collecting data and generating reports.
"Projects" or Forms are created with the Mobile Data Anywhere Designer, which are then be uploaded to the Mobile Data Anywhere portal and deployed to mobile devices so that data can be collected on the device.
The Mobile Data Anywhere mobile app runs on Android and iOS. Once a Project has been downloaded to a device, new data records or "Sessions" can be created on the device and sent to the Mobile Data Anywhere portal where they can be viewed and reports can be generated, or data can be exported.
This Quick Start Guide takes you through the following step by step tutorial to help you get up and running in minutes.
- Register for an account
- Log in and add a device
- Install the app on your device
- Install the app on iOS
- Deploy the project to your device
- Create a session on the device and send it to the portal
- View the session and generate a PDF Report
- Create your own Project
- Upload your Project to the Mobile Data Anywhere portal
- Configure the project to email a PDF report when a session is created
- Create a session and get an email of the PDF report
Register for an account
If you have not already registered for an account click here to register and log in.
Log in and add a device
Once you have registered and logged in, the first screen that you will see will be the Control Panel.

Click on the Devices menu in the Top menu to navigate to the Devices page.
When you created an account a device based on your name was automatically created. Each device has a Device Name and a Unit Id.
The Device Name is a description of the device.
The Unit ID is a unique identifier used to identify the device that is connected and to identify which device collected a session.
You can either use the default device, or you can create a new one.
To add a new device press the Add New Device tab and enter the device Name and Unit ID and press Save.
Press the Settings Tab you will see the device settings that must be configured on the device.
By default a random Device Password is generated that will be used on your device to connect to your account. This is a single password which can be used on all of your devices to connect to your account.
You can change this password to something easier to remember by pressing the Edit button, changing the password and pressing Save.
Now that you have set up a device and changed the Device Password you can go and install the app onto your device.
Installing on an Apple iOS device
The Mobile Data Anywhere client application for iOS (iPhone and iPad) is a free app available through the App Store. It is compatible with iOS 6.0 and later. It can be downloaded using iTunes and synced onto a iPhone or iPad or it can be downloaded directly on the device using the App Store application.
You can either visit this page on your iPhone or iPad and click on the link below.
Install App from the App Store
Or you can go to the App Store on your device by tapping on the App Store icon and search for “Mobile Data Anywhere”. Once you find the app in the App Store you will see the app below.
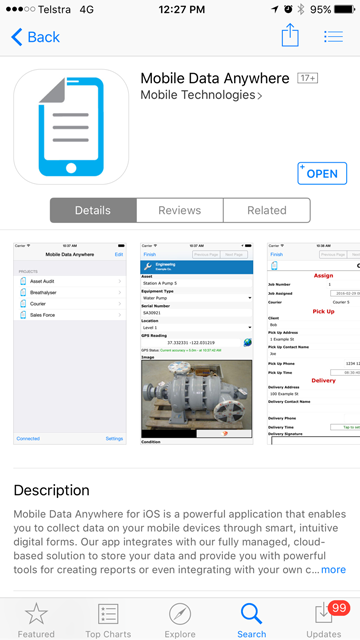
Press the Install button.
Once installed you will see an app icon on your iPhone that looks like this.
![]()
Tap on the icon.
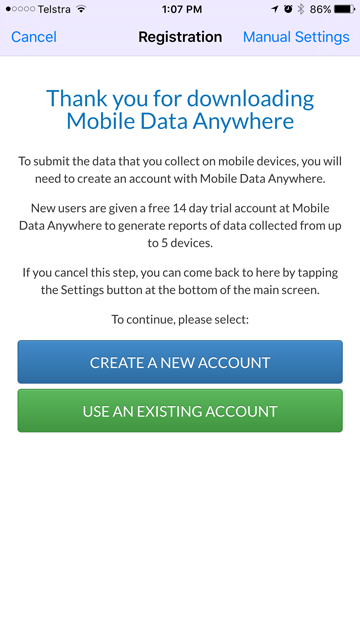
Once the app is launched you will see the following welcome screen.
Installing on an Android device
The Mobile Data Anywhere client application for Android is a free app available through the Play Store. It is compatible with Android devices running Gingerbread 2.3 and later.
If you view this page on your Android device you can simply click the link below to go to the Play Store page to download the app.
Install App from the Google Play Store
Alternatively, you can find the app in the Google Play Store by searching for Mobile Data Anywhere
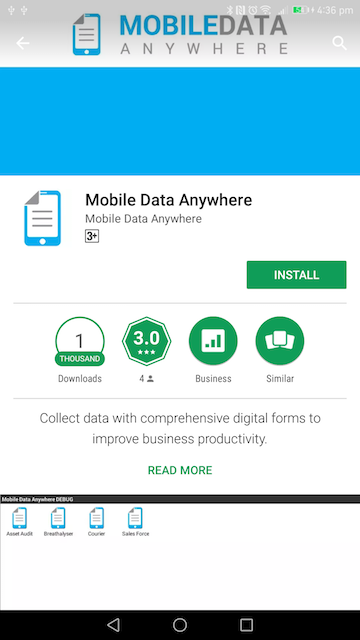
Press the Install button.
Once installed you can open the app using the app drawer or from the home screens. The app's icon is shown below:
![]()
Tap on the icon to open the app.
Once the app is launched you will see the following welcome screen.
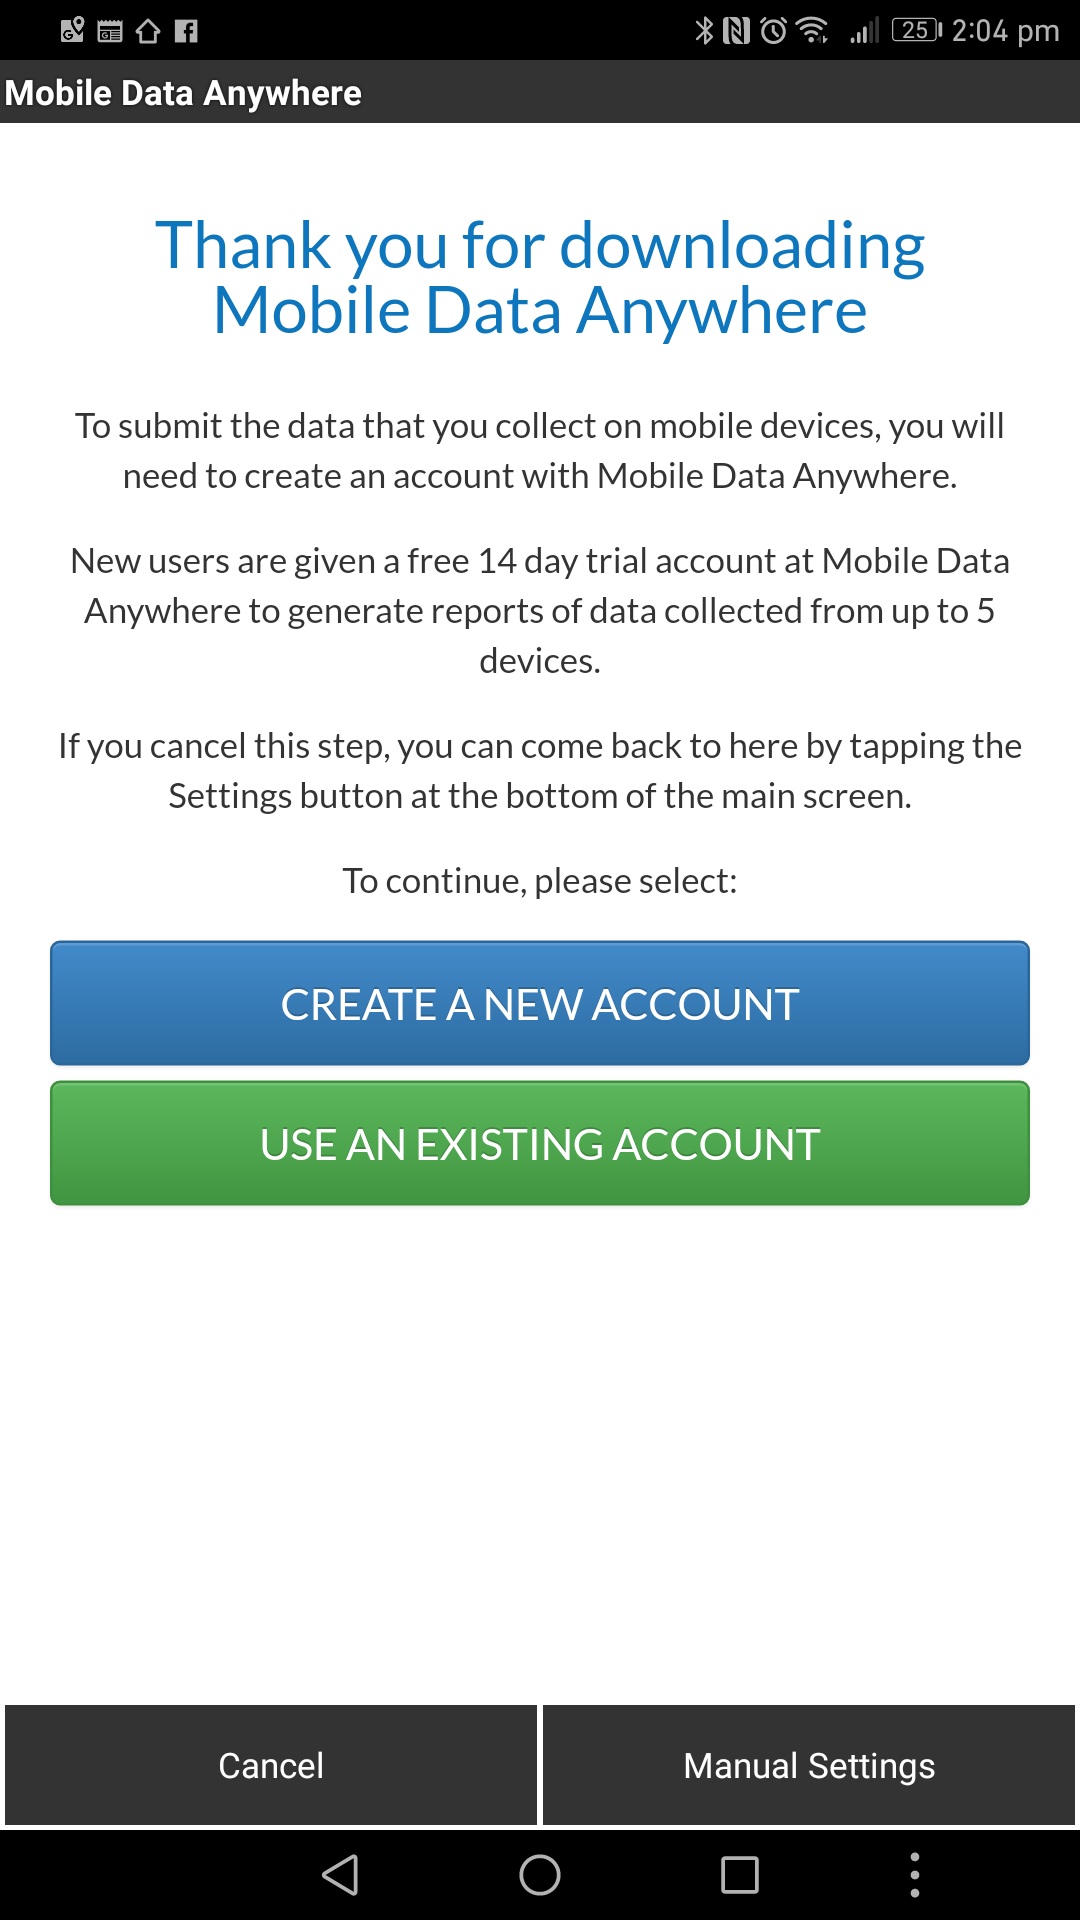
Connect the device to your account
You can log-in with your account details that you originally set up your account with by pressing the USE AN EXISTING ACCOUNT button.
Enter your details and press the SIGN IN button.
You will be shown the device selection screen where you can press the Select button next to the device. This will configure your device with the Unit Id and the Device Password for your account.
You can also configure the settings manually by pressing the Manual Settings button at the top right and entering the Settings from the Device Settings tab in the Mobile Data Anywhere portal.
Now that the device is configured to connect to the portal, you can go and deploy a project to the device.
Deploy the project to your device
Go to the web portal and click on the Projects menu at the top.
Click on the Courier project.
At the bottom of the page you will see a list of the devices that this project is linked too.
Find the device that you added before and press the link & deploy link on the right.
Now this project will be linked to your device, whenever a project is updated it will be downloaded to the device next time the device connects.
Go back to your mobile device and open the app.
Go to the Projects list and make sure that you are connected by pressing the Connect button at the bottom left.
You should hear a notification when the project arrives and it will be a red colour like the screen below.
Now that you have received the project you can open it and create a new session.
Create a session on the device and send it to the portal
Go back to the app on the device and navigate back to the projects list.
Tap on the Courier Project which will open the session list page.
Tap on the Start New Session button at the bottom right.
Now fill in some of the data from the project so that it looks like the screen below.
Press the Finish button at the top left
Tap on the Menu button at the top right.
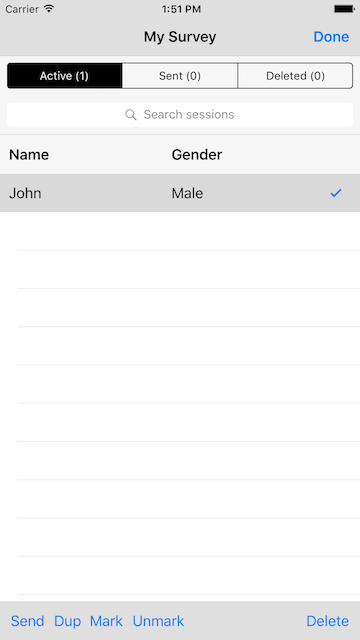
Tap the session so that it has a tick.
Tap on the Send button on the bottom left.
The session will be sent to the server and you can go and take a look at the data.
View the session and generate a PDF Report
Go back to the web portal and go to the Projects menu and select the Courier Project again.
Click on the Sessions tab.
You should see the session that was just created in the list.
To export the session select the session by selecting the check box on the left and below the Export Sessions heading, select the PDF document type and click Start Export.
Once the session has been exported you can press on the link and it will be downloaded.
Your final report will be downloaded as a PDF and look like this.
Congratulations you have now configured your device, deployed a Project, created a Session, sent it to the portal, and generated a report.
Next you are going to learn how to create your own Project so that you can replace your paper processes with mobile forms.
Create your own Project
First you will need to download the Mobile Data Anywhere Designer to your PC.
The Mobile Data Anywhere Designer is an application that can be run on any Windows PC and is a simple drag and drop designer.
Go to the downloads page and download the Mobile Data Anywhere Designer application.
Once downloaded click on the installer and follow the instructions to install the application.
Launch the application by finding the Mobile Data Anywhere Designer application in the Start Menu.
Look for the icon like the one below.
Once launched you will see the Welcome screen.
Press the Create new project button.
Select a location to save the project and call the project MySurvey.
Press the Save button.
Change the Title to say My Survey.
Change the Company to have your company name.
Press OK.
Delete the Sample Page by selecting the Sample Page on the left and press the Delete Page button down the bottom.
Next press the Add Page button.
Change the Caption to say Survey.
Press OK.
At this point you will have a project with one page called Survey.
Press the Add Point button.
Select the Edit Point and press the Insert button.
Change the Caption to be Name. You will notice that the ID Name is automatically populated.
Press OK.
Press the Add Point button.
Select the Selection Point and press the Insert button.
Change the Caption to be Gender.
Press the Selection Tab.
This is where you can add some predefined options that can be selected.
Press the Add button and add an item called Male.
Press OK.
Press the Add button and add an item called Female.
Press OK.
Press OK.
Now you will have a project called My Survey with one page and two points where you enter the Name and the Gender of a person.
Now we are going to specify what columns should be used to display in the list of sessions on the mobile device and in the web portal.
Double click on the Properties icon and go to the Options Tab.
Under the Session List Columns field, select the Insert Point drop list and select the Name.
Do the same for the Gender.
Now we have defined what columns will be used in the sessions list.
Press OK
Press the Save button.
Now you can upload the Project to the Mobile Data Anywhere portal.
Upload your Project to the Mobile Data Anywhere portal
Now that we have created the Project we can upload it to the web portal.
Go to to web portal and go to the Projects page.
Press the Upload Tab.
Press the Choose File button.
Go to the directory where you created and saved the Project.
Find the project and press the Open button.
Press the Upload Project button.
This will upload the project and take you to the project summary page.
Go down to the devices at the bottom of the page and Link your device to your project.
Configure the project to email a PDF report when a session is created
Before we collect any data on the mobile device, we will want to configure the project so that when a new session is created and sent to the portal, it will automatically generate a PDF report and email it to you.
Select the Options tab from the Project page.
The options page is where you can configure different options for the project.
Expand the PDF section of the Options.
Tick the checkbox to generate the PDF when a session is received.
Enter the Email Address that you want the report to be emailed to.
Enter the Subject that you want in the email.
Enter the Message that you want in the email.
Scroll down and press the Save Options button at the bottom.
Now you can go to your mobile device and create a new session and send it to the server and you should receive a PDF report via email.
Create a session and get an email of the PDF report
Go back to your device and go to the Projects list.
The project should have arrived on your device as we linked it before.
Open the Project.
Press the Start New Session button.
Enter a name in the Name field.
Select the Gender.
Press Finish.
You will see in the session list the columns that are shown in the list are Name and Gender.
Press the Menu at the top right.
Select the session.
Press Send.
Go back to the portal and go to the Sessions list for the Project.
You should have also received an email of the PDF report in your emails that looks like this report.
Congratulations you have successfully created your first project, collected data and received an email report.
Next we recommend learning some of the more advanced features of the Designer so that you can quickly create Projects for your business processes.
Create powerful mobile forms for your business in minutes